Concise Manual for Quiz Bowl
Statistics Program Version 4
For the most part, the program should be fairly intuitive to use. Hopefully many common questions and problems are resolved by this documentation. Especially important instructions that may not be completely intuitive are in bold italics.
Requirements and Installation
All you need to run the program is a Windows computer. All you need to do to install it is to download it and run the InstallShield Setup. The program will be installed into a folder named SQBS in your Program Files directory, SQBS will be added to your Start Menu, and a shortcut will be created on your desktop. If you want to publish the web pages it generates, of course you will need an active internet connection and an account on a server to which you have FTP access.
Beginning a Tournament and Selecting Options
To start a tournament and type in rosters, launch the program and select New Tournament from the File menu. The Tournament Options Dialog Box will appear.
Enter the point values of the questions used in your tournament in the boxes in the first group box. Be sure the box to the left of the values is checked for each question type you are using, and not for any others. For example, if you are using standard 15/10/-5 NAQT format, be sure these numbers are entered in the first three boxes and that these are checked, and that the fourth box is not checked.
In the second group box, select the types of "specialty" statistics applicable to your tournament format which you would like to track. If you track toss-ups heard, the game entry form will include a box for this, and reports will include the number of toss-ups heard and points per toss-up heard. If your tournament includes powers and negs, reports will include power to neg ratios. When power and neg tracking is used, it is always assumed that the first question type (as ordered in the first group box of the Tournament Options dialog box) is a power, and the third is a neg. If you track lightning round points, the game entry form will include a box for this, and reports will include the lightning round point totals. If you use divisions, you may classify each team into a division, and have team standings reported separately for each division (while still having combined individual and round statistics). (If you want to handle all aspects of each division completely separately, including individual statistics, just launch a separate copy of the program for each division. Just be sure to use different names and/or different folders for the reports and data files so they do not overwrite each other.)
In the third group box, you select how to track bonus points. If you choose None, bonus statistics will not be entered or reported. If you select Manual, the Game Entry Form will include boxes for the number of bonuses heard and the number of bonus points earned by each team, and bonus statistics will appear in the reports. Manually entering these will probably require game scorekeepers to track and note these statistics on their scoresheets. For most tournament formats, bonuses heard equals total number of (positive valued) toss-ups answered, and bonus points equals total score minus all individual scores and (if applicable) lightning round scores. Thus, if you select Automatic Bonus Tracking, bonus statistics will be automatically calculated using these formulas and will appear in the reports and in uneditable boxes on the game entry forms. One exception to these formulas is that, in most formats, overtime periods consist only of toss-ups. A correction for this can be made on the Game Entry Form (see "Entering Games" Help Section). Additional options are available for more uncommon tournament formats. Selecting "Manual Hrd, Auto Pts" calculates bonus points automatically according to the formula above, but allows you to specify the number of bonuses heard. Selecting "Manual with Bouncebacks" allows you to enter bonus bouncebacks heard and points stolen for a team separately from the team's own bonuses.
Notes for unusual tournament formats: If there are more than four different valued types of toss-up questions, such as a 25/20/15/10/5 format, it is recommended that you select only one question type with a value of one point. Then, on the game entry forms, you can enter individual points rather than number of toss-ups for each player. The break-down of toss-ups by point value will of course not be available in reports, and Automatic Bonus Statistics will not function properly (you should select either Manual or None), but everything else should work properly. The lightning round option can be used for any type of round in which points are scored by the team as a whole.
Note also that you need not enter team and individual statistics at the same time. If you are pressed for time during the tournament, you can just enter the team names in the Roster Entry Form and just select the teams, and enter the scores (and any other data you want, such as toss-ups heard) in the Game Entry Form during the tournament. In order to avoid warnings, be sure to deselect all warnings under Settings->Warnings. Team Standings reports will of course have incorrect or incomplete information for unentered stats, but the records, PPG, PAPG, Margin, and any other entered data will be correct. You can then later go back and enter individual names in the rosters (if you have not already), re-enable warnings (if you want), and enter all other stats in the Game Entry Form. When returning to a game to enter individual stats, you can either select each individual names from the drop-down lists, or re-select the team name to make the default name selections for the team's players.
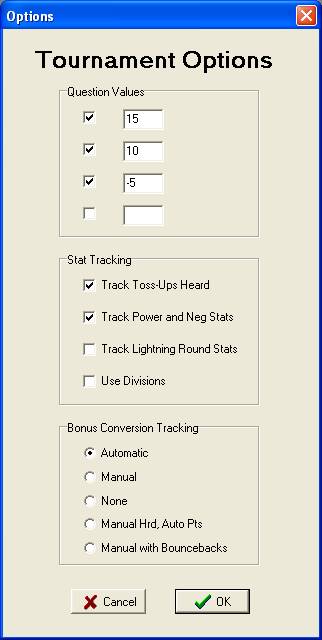
Example of the
Tournament Options dialog box. As
shown, it is set up for standard NAQT format (the default), with 15, 10, and
-5 point questions. Toss-ups
heard and power to neg statistics are tracked, and bonus statistics are
calculated automatically. There
are no lightning rounds.
Entering Rosters Manually
After selecting the tournament options, the Roster Entry Form and the Game Entry Form appear.
If you chose to use divisions, the Division Entry Form also appears. If you are using divisions, first enter a name for each division in the memo box, one per line. Click the Enter Button when you have finished. You may return to the Division Entry Form at any time to edit or add division names. Remember to press the Enter Button to commit your changes. However, do not delete any divisions once you have begun entering rosters, as this WILL change previously entered team classifications (though you can correct this by going through all previously entered rosters again and making needed corrections to the team classifications). It is however okay to delete divisions before entering rosters. You may also at any time change whether you are using divisions by selecting Settings->General from the Main Menu and checking or unchecking the Use Divisions checkbox. (Note that if you change this setting, the entry forms will reset back to the first entered game and roster, so you may need to scroll to get back to the current game or roster. Also, the Division Entry Form will appear or disappear).
On the Roster Entry Form, enter team and player names, using the Previous and Next buttons to move between teams. Enter the team's name in the top edit box. If you are using divisions, select the division in which the team is playing from the Division Drop-Down Box. Enter each player's name on a separate line in the memo box. There is no limit to the number of players on a team, or to the number of teams. You may go back to edit or add names at any time. Even after you have begun entering games, you may go back and edit player or team names (such as making replacements or misspelling corrections), or add players or teams. However, do not delete any team or players once you have begun entering games. Teams or players with no games played will not appear in any reports, so there is no need to delete them. Deleting players or teams after games have been entered WILL cause the reports to be wrong (though you can correct this by going through all previously entered games again and making needed corrections). It is however okay to delete teams or players before beginning to enter games.
You
may return to the Division Entry Form and Roster Entry Form at any time to
create new divisions, and re-classify teams (by selecting new divisions from
the Division Drop-Down Box on the Roster Entry Form). This may especially be useful if you group teams into upper
and lower divisions mid-way through the tournament based on earlier
performance. After
re-classifying, standings may be generated using either all games or only the
games since re-classification by specifying which rounds to include under
Settings->Reports (see Customizing Reports under the Generating Reports
section).
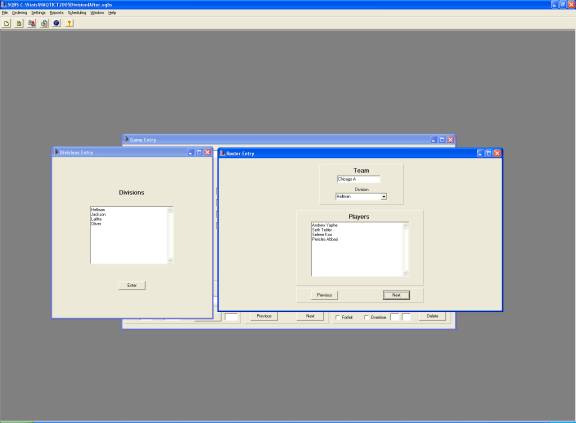
Example of entering rosters manually.
Entering Rosters from a File
Alternatively,
you can read in rosters from a text file.
Launch the program, and choose Read Rosters from the File menu.
Select the file with the rosters from the Open Dialog Box that appears.
The Tournament Options Dialog Box will then appear. Make choices as described in the "Beginning a Tournament
and Selecting Options" Help Section.
After clicking "OK", the Game Entry Form and the Roster Entry
Form, already filled out based on the text file, will appear.
If you are using divisions, the Division Entry Form, filled out based
on the text file, will also appear. You
may edit names in the Roster Entry Form and the Division Entry Form if
necessary (see "Entering Rosters Manually" Help Section).
Do not delete teams, players, or divisions once you have begun entering
games. The text file should list
the team name and then the player names (no limit to how many), each on a
separate line. If you are using
divisions, the division name for each team should appear on the line just
below the team name. Separate
teams using a line with a period, and mark the end of the list of rosters with
a tilde (~). For example, a
two-team tournament field could be read in by the text file:
Team 1
Player 1
Player 2
Player 3
Player 4
Player 5
.
Team 2
Player 1
Player 2
Player 3
Player 4
Player 5
Player 6
Player 7
Player 8
Player 9
Player 10
.
~
Example of a text file of rosters (no divisions) that can be read in using Read Rosters in the File menu.
Team 1
Division A
Player 1
Player 2
Player 3
Player 4
Player 5
Player 6
.
Team 2
Division B
Player 1
Player 2
Player 3
Player 4
Player 5
Player 6
Player 7
Player 8
Player 9
Player 10
.
~
Example of a text file of rosters (with divisions) that can be read in using Read Rosters in the File menu.
Entering Games
Choosing the teams. After entering the rosters, you may begin entering games in the Game Entry Form. Most of the form should be self-explanatory. For each game, select the two teams from the drop-down menus, which include all team names from the rosters you entered. If you entered the rosters in some random order, but would like for the team names to appear alphabetically in the drop-down menus so that they are easier to find, you may choose Sort Teams from the Ordering Menu and click OK when the confirmation box appears. The Game Entry Form will return to the first game, so you may need to navigate back (using Next or Go To) to get back to where you had been (see Managing Games Help Section below).
Choosing the players. As you select a team name, the names of its players automatically appear on the form in drop-down boxes. If there are fewer than eight players on a team, only as many rows will appear as there are number of players. By default, the first player on the roster is automatically selected in the first row, the second player in the second row, and so on. Also by default, the number of games played is set to one for the first four players (or for all players if there are fewer than four players on the roster) and to zero for any additional rows. Thus, in the common case that a team has only four or fewer players (all of whom are playing), or the first four players on the roster play (with no substitutions), you do not need to edit the player name drop-down boxes or games played boxes at all. Otherwise, you can change the drop-down selections and the games played boxes in any way you want so that all players who played in the game are selected on some row, and their respective stats, including games played, are entered on the row in which their name is selected, just as you would obviously expect.
Substitutions
and games played stats. If
substitutions were made during the game, you can enter a fractional part of a
game under games played. You may
enter either a decimal or a fraction. For
example, if there is a substitution at halftime, you might enter
"0.5" for the two players who switched. If substitutions are made during a timeout, or if you have a
timed format in which the number of toss-ups can vary per round and want
greater accuracy, you can enter a fraction such as "11/23" for games
played, meaning the player heard 11 toss-ups in a match that had 23 toss-ups.
A fractional entry will appear as a decimal if you scroll back to the
game later.
Entering
individual stats. Enter the
number of toss-ups of each value (not the total point value of toss-ups of
that value) answered by each player. Point
values are automatically calculated from the number and values of the
questions answered. For example,
if a player got two 10-point questions and one -5, enter 2 in the 10s column
and 1 in the -5s column for this player, and 15 will automatically appear in
the total points. You need not
(and may not) edit the point total, as it is calculated automatically.
Any toss-up stats entered for a player with games played equal to zero
will be ignored when the game is entered.
In order to remind the user to correctly enter games played, the
toss-up stat fields for a player with games played equal to zero will be
disabled until a positive games played is entered.
Entering TUH and bonus stats. If you selected the Track Toss-Ups option in the Tournament Options Dialog Box, a box labeled "Toss-Ups Heard" will appear in which you can enter the number of toss-ups read in the game. If you selected the Lightning Round option, two boxes labeled "Ltng Pts" will appear in which you can enter the number of points each team scored in this round. If you selected Automatic or Manual Bonus Statistics, boxes will appear for the number of bonuses heard and the total number of points gained on bonuses for both teams (labeled "Bonii "Heard" and "Pts"). With Manual Bonus Statistics, you should enter values in these four boxes. With Automatic Bonus Statistics, these values are calculated automatically and will be updated continuously as you enter data (but you may not edit them directly). If you selected Manual with Bouncebacks Bonus Statistics, boxes will also appear for the number of bouncebacks heard and points stolen for both teams (labeled "BncBks" and "Pts"), and you will need to manually enter data for all bonus statistics.
Entering round numbers and game ids. You may enter a round number (a positive integer) in the box labeled "Rnd". If you do, and if you check the Round Reports Checkbox in the Reports Tab of the Settings Dialog Box (choose Reports from the Settings Menu), the full web report will include a page with cumulative stats about each round (see "Reports" Help Section), and the Scoreboard page will separate boxscores by round. By default, the games are given sequential numerical id's, but you may enter any other alphanumeric identification system you want in the box labeled "Id", such as "R1G3" for Round 1 Game 3.
Forfeits. If a game is a forfeit, you need only select the two teams from the drop-down boxes at the top of the form and check the box labeled "Forfeit." The first team (left-side) is considered the winner and the second team (right-side) is considered the loser. If the forfeit box is checked, any other statistics on the page (including the number of games played by individuals) will be ignored, and fields will be disabled, so you do not need to change the default ones in the games played boxes to zeros.
Overtime and ties. If a game goes into overtime, you should check the box labeled "Overtime." If you are using Automatic Bonus Statistics, the number of (positive valued) toss-ups answered in overtime needs to be subtracted from the total number of (positive valued) toss-ups answered in the game in order to calculate the number of bonuses heard, since there are (in most formats) no bonuses in overtime. Therefore, if you are using Automatic Bonus Statistics, if a game has gone into overtime, you should check the Overtime checkbox and enter in the number of (positive valued) toss-ups answered by the team selected in the left-side drop-down box in the first box to the right of the Overtime checkbox and enter the corresponding number for the team selected in the right-side drop-down box in the second box to the right of the Overtime checkbox. If you are using Manual Bonus Statistics, or are not tracking bonus statistics at all, or are using a format in which there are bonuses in overtime, there is no need to enter these numbers, although you may still want to check the Overtime box so that the Scoreboard report denotes it as an overtime game. If in your format games may end in a tie, just enter the game as normal, with of course the same score for both teams. The tie will appear in team standings and game result reports.
Entering games. A game is officially entered into the database when and only when its form is completed, by clicking (or tabbing to and pressing Enter) either the Next, Previous, or Go To Buttons. Thus, reports may not include the last game you entered unless you have officially entered it by clicking one of these buttons.
Warning messages.
You may select which, if any, consistency checks you would like the
program to check for you as you enter each game. You may select which warnings to display by
selected/deselecting the checkboxes under Settings->Warnings.
By default all warnings are enabled.
Obviously most data entry errors cannot be caught by the program; it
knows nothing about the games you enter except what you tell it.
However, if the entered data has caused certain types of
inconsistencies, a warning message appears when you click "Previous"
or "Next" to enter a game. It
will still accept the data and will proceed to the next game once you click OK
on the message box, but it might be a good idea for you to go back to the game
you just entered and check for problems.
If the format of your tournament is such that certain warnings are not
applicable, or if you are just annoyed by warning messages, you will probably
want to deselect warnings by selecting Warnings from the Settings Menu and
unchecking the appropriate checkbox(es).
Inconsistencies that may (optionally) be checked are 1) The same team
is entered twice for the same game, 2) The same player is entered twice for
the same game, 3) The sum of the individual scores for a team's players in the
game plus the team's bonus points (if applicable), lightning round points (if
applicable), and bounceback points (if applicable) is not equal to the total
score for the team in that game, 4) The total number of games played for a
team's players in the game exceeds four, 5) The calculation of bonus points
and bonuses heard in the game for a team results in a points per bonus heard
less than zero or greater than thirty, 6) Some positive amount of bonus points
is calculated for a team in the game, but the number of bonuses heard is zero,
7) A negative value has been entered for toss-ups heard.
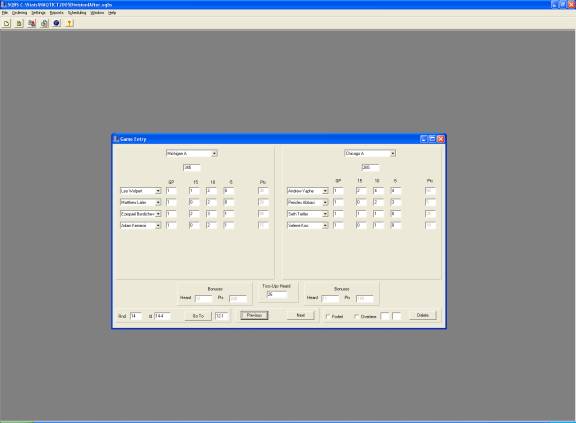
Example of Game Entry Form.
Managing and Editing Games
Editing, deleting, and navigating through games. After entering a game, click the Next Button to go to the next game, and enter it in the same way. You may use the Next and Previous Buttons to navigate through previously entered games and make changes at any time. Remember that changes to a game you are editing will not be reflected in reports until you have re-entered that game, by clicking Next or Previous or Go To. You may at any time "jump" to a specific game by entering its id number in the box next to the Go To button, and then clicking this button. (It is not a good idea to have two games with the same id; however, this is not enforced, so if it occurs "jumping" to the id will take to the first-entered game with that id.) Any changes made to the rosters while entering games will be reflected in the Game Entry Form the next time you enter a game (by pressing Previous or Next). To delete a game, navigate to that game and press the Delete button, and click OK on the confirmation dialog box that appears.
Grouping games by round. If you have entered round numbers for the games in the box labeled "Rnd" (see "Entering Games" Help Section), you can sort games by round. For example, if you forgot to enter one scoresheet from a round until after having entered other rounds, but would like all the games from each round to appear together as you scroll through the Game Entry Form, you can select Group Rounds from the Ordering Menu and click OK in the confirmation box that appears. The Game Entry Form will return to the first game, so you may need to navigate back (using Next or Go To) to get back to where you had been.
Sorting games by id. Likewise, you can sort games by game id (see "Entering
Games" Help Section). Select
Sort Games from the Ordering Menu and click OK in the confirmation box that
appears. The Game Entry Form will
return to the first game, so you may need to navigate back (using Next or Go
To) to get back to where you had been.
Generating Reports
At
any time during the tournament, you may generate up-to-date reports.
Creating the Reports. The
Full Web Report will automatically create a complete set of fully formatted,
interlinked HTML documents for the tournament.
If you select Full Web Report from the Reports Menu (or click the Full
Report Speed Button on the taskbar), a standard Windows Save As dialog box
appears. Select (or create) the
folder in which you want to save the pages, and type a name for them (such as
"aggiebowl" or "round1").
Types of Reports. Up to seven web pages will then be created, each named with the base name you entered and the type of report it is. For example, if you entered "example" in the Save As dialog box, pages may be generated for team standings (example_standings.html), individual standings (example_individuals.html), a scoreboard (example_games.html), team details including each team's game-by-game results and player stats (example_teamdetail.html), individual details including each player's game-by-game stats (example_playerdetail.html), round reports including cumulative stats about each round for comparing the difficulty level of different packets (example_rounds.html), and a key explaining all of the statistics (example_statkey.html).
Customizing the Reports. You may select exactly which pages will be included in your report by checking or unchecking the checkboxes in the Reports Tab of the Settings Dialog Box (accessed from the Settings Menu). Each page has a link to each other page at the top, and team and player names are linked to their expanded statistics in the team detail and individual detail pages (if included in your report). If you have entered a tournament name under the General Tab of the Settings Dialog Box (accessed from the Settings Menu), this name will appear in the title of each page. You may also provide your own names for each web page using the edit boxes on the Reports Tab of the Settings Dialog Box. If you have entered round numbers for the games in the Game Entry Form, you may also select which rounds to include in the report (such as just preliminary rounds or just playoff rounds) under the General Tab of the Settings Dialog Box (accessed from the Settings Menu). If you check the "British Style Reports" checkbox, all references to "toss-ups" will be replaced by the British term "starters" in the reports.
Using Cascading Style Sheets. You may provide a cascading style sheet to be used with the generated web pages by checking the "Use Style Sheet" checkbox in the Reports Tab of the Settings Dialog Box and entering the complete path and file name for your style sheet.
Report Descriptions. If the Divisions Option is selected, a separate standings table for each division appears in the Team Standings Report. Most statistics on the pages should be easily understood by anyone in quiz bowl (and are further explained in the Stat Key Web Page, if included). The Scoreboard includes miniature boxscores for each game. If the Round Reports option is selected (accessed in the Reports Tab of the Settings Dialog Box), the Scoreboard will note the rounds, and, even if you did not enter all games from a round consecutively, they will be grouped by round. The score is on the first line in larger font, the players are listed on the second and third lines, along with the number of each type of question they answered and their point total for the game, and (if applicable) lightning round and/or bonus stats (bonuses heard, bonus points, points per bonus) for both teams are on the final line. The Rounds Report includes the average number of points scored per team, the average number of toss-up points scored per toss-up heard (if applicable), and the average number of points scored per bonus (if applicable).
Posting to the Web
Before doing this for the first time, you must enter your FTP settings by selecting FTP from the Settings Menu and entering your host name (e.g., ftp.tripod.com), your user name (e.g., "csewell"), your password (which will appear as asterisks for security), the desired destination directory (e.g., "wildcat/"), and the base file name. It will (attempt to) create the directory if it does not already exist. All file names will be the file type (e.g., "_standings.html") appended to the base file name.
If the "Always use / in paths" option is deselected, the tournament files will be written to the destination represented by your entered destination directory, exactly as entered, concatenated with the file name (e.g., "wildcat/example_standings.html"). However, if you forget the trailing slash, you will likely not get the desired result (e.g., the file "wildcatexample_standings.html" in the root directory). If the "Always use / in paths" option is selected (as it is by default), this slash will be added if you forget it. However, if your server file system differs from this standard, you can deselect this option and enter the path exactly as you want it.
After this initial setup, you can just select Post to Web from the Reports Menu or click the speed button each time you want to update your website. The program will generate and save the files in the current directory on your local computer and automatically upload them. If there is a connection or transfer error, a message will appear informing you of the error. Otherwise, you will be notified when the transfer is successfully completed.
Note that, for security reasons, your password will not be written to file when you save the tournament, so you must re-enter your password in the FTP Tab of the Settings Dialog Box each time you re-launch SQBS (but not after every time you save the tournament without closing the program).
QuickPrint Reports
Although of course the web
pages can be printed, the QuickPrint reports available in the Reports Menu
provide the ability to immediate view and print team standings, individual
standings, and a scoreboard directly from the program.
If QuickPrint Teams, QuickPrint Individual, or QuickPrint Games is
selected from the Reports Menu, the respective fully-formatted report will
appear in a pop-up window. If the
Divisions Option is selected, a separate standings table for each division
appears in the QuickPrint Teams Report.
The report may be directly printed from this window by clicking the Print button. You may change the page orientation by choosing Page Setup from the File menu (the standard Windows Print Setup Dialog Box will appear), and you may change the font size by using the box above the Print Button in the printable window. The report is in an editable text box, so you can add comments or make changes directly to the report before printing. This window will disappear when you click the close button or the minimize button, but a new printable pop-up window will appear every time you select one of these reports.
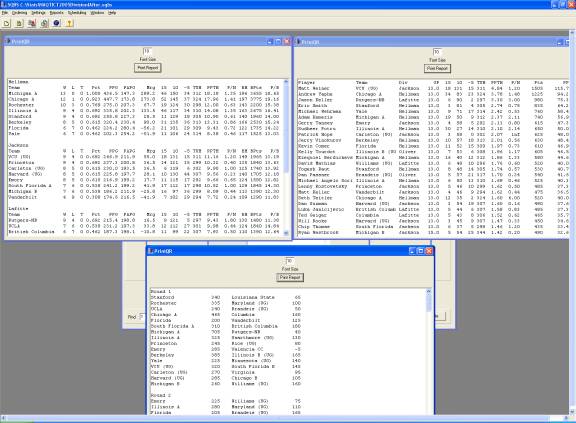
Examples of QuickPrint report
Sort Options
Sort options for team rankings. You
may select the method used for ranking teams in the Team Standings Reports
under the Sorting Tab in the Settings Dialog Box (accessed from the Settings
Menu). The first (and default)
option is to rank by winning percentage, with ties broken by average points
per game. The second option is to
rank by winning percentage, with ties broken first by head-to-head record, and
secondarily by average points per game. A
bug in previous versions related to tie-breaking for circles of death has been
fixed in Version 3.4. These two
options are also available with points per toss-up heard used instead of
points per game. Also, there is
an option to break winning percentage ties based on a calculated strength of
schedule, which may be useful for tournaments with randomized pool play.
Strength of schedule for a team is calculated as the average points per
game (across all games) for all teams it played plus itself.
(For example, if a team averaged 120.0 points per game and played two
teams, one of which averaged 100.0 points per game and one that averaged 80.0
points per game, its strength of schedule would be (120+100+80)/3 = 100.0.)
Sorting players by pts/tuh. Normally,
in the Individual Standings Reports, individuals are sorted according to
points per game. You can instead
sort by points per toss-up heard (assuming you selected to track toss-ups
heard in the Tournament Options Dialog Box and have entered the number of
toss-ups heard for each game) by checking the Sort by Pts/TUH Checkbox in the
Sorting Tab of the Settings Dialog Box (accessed from the Settings Menu).
This may produce a slightly different ranking of players that may be
somewhat more fair for tournaments in which the number of toss-ups heard
varies by game.
Scheduling
Also available under the Scheduling Menu are several types of automatic schedulers that can assist in running your tournament. All are generated based on options specified under Settings->Scheduling and display a schedule, using the team names as entered in the Roster Entry Form (or read from a file; see Entering Rosters Manually or Entering Rosters From a File sections), in a pop-up, editable, printable window just like the QuickPrint Reports (see QuickPrint Reports section). In all cases, if you are using divisions, each division is scheduled completely independently. (If you have been using divisions but then want to schedule all teams together, save a copy of your tournament and de-select the "Use Divisions" box under Settings->General; you may also create new divisions and re-assign teams at any time.)
Round Robin. The first scheduler in the menu is the Round Robin Scheduler. This will generate a standard round-robin schedule where each team plays each other team (within each division, if using divisions). Under Settings->Scheduling, you may specify how many rooms are available. If the "As Many As Needed" radio button is selected under Round Robin (as it is by default), it is assumed that you have floor(n/2) rooms available, where n is the number of teams. If you instead select the "Limit" radio button and specify a number of rooms in the neighboring text box, no more than that number of games will be scheduled in a round (thus putting more teams on byes each round if necessary).
Swiss Pairs. The second scheduler allows for real-time Swiss Pairing. Selecting this will generate a set of pairings (independently for each division, if using divisions) of teams based on the current standings. Teams are grouped by winning percentage and then "seeded" within the group by points per tossup heard if the track toss-ups heard option was selected in Tournament Options and the "Pts Per TUH" radio button is selected under Swiss Pairing in Settings->Scheduler, or by points per game otherwise. The top seed in each group plays the worst seed, the second seed the second worst, etc. If the group size is odd, the best team from one group down is added (but still all teams in that group are seeded by points per tossup heard or points per game). If there are an odd number of teams in the division (or in the entire tournament, if not using divisions), the lowest ranked team overall for which no other team has played more games to date, is given a bye. A backtracking algorithm is used to try to prevent teams from playing each other a second time. If no repeat-free set of pairings can be found, a set of pairings without regard to repeated games is given, with all pairings of teams which have previously played each other marked "REPEAT".
Random, General Scheduling. The final scheduler allows for flexible schedule generation for (virtually) any number of rounds, rooms, and teams. The numbers of rounds are rooms are specified under Random in Settings->Scheduling; if the "As Many As Needed" radio button is selected under Number of Rooms, it is assumed that you have floor(n/2) rooms available, where n is the number of teams. A schedule is then generated, if possible, such that every team plays the same number of games, and no team plays any one other team more than once more than it plays any other team (which means no teams play each other twice unless every team plays greater than or equal to n games, where n is the number of teams). In general, each team will get to play floor((rounds*rooms*2)/teams) games. However, if this number and the number of teams are both odd, each team can play only floor((rounds*rooms*2)/teams)-1 games. The number of games may be less than the number of available rooms in some rounds due to the constraint that all teams play the same number of games. This type of scheduling may be particularly useful for scheduling preliminary rounds for a field too large for a full round-robin.
Saving and Opening Files
You may save the tournament at any time, using different names for different back-up versions or just overwriting the same file. Standard Windows Save, Save As, and Open options are available from the File Menu (or you may use the Ctrl-S, Ctrl-A, or Ctrl-O keyboard shortcuts, respectively) and use standard Windows file dialog boxes. Once you have saved a file, the name of the currently open file appears in the title bar of the main program window.
You
may also have the program automatically save backups at a specified frequency.
If you check the "Auto Save" checkbox under
Settings->General, a file named "sqbsautosave.dat" will be
written to the current directory at regular intervals (each time overwriting
the previous sqbsautosave.dat). The
number of minutes between auto-saves may be specified in the
"Every...Minutes" box next to the Auto Save checkbox; by default it
is at ten minutes.
To open an old tournament file created using SQBS 1.x, select Import SQBS 1
File from the File menu, and open the file using the standard Windows Open
File Dialog Box that appears. Likewise, to open an old tournament file
created using SQBS 2.x, select Import SQBS 2 File from the File Menu, and open
the file using the standard Windows Open File Dialog Box that
appears.
Merging Files
You can combine two or more data files into a single file. For example, in a large tournament it may be more efficient to have multiple people enter stats on multiple computers, and then combine the files at the end to create one unified report. Just open the first file you want to merge as normal (using File->Open Tournament), and then select File->Merge Files, and select the second file in the Open File Dialog Box that appears. You can continue to add additional files in the same way.
There are several important things to note about merging files. First, all tournament settings remain as in the first opened file. Second, all teams and players that are exactly the same in the two files are assumed to be the same, and all that are not exactly the same are assumed to be different. Be careful that two different teams (or players) do not have the same name (e.g., if State University has an A team in one file and a B team in another, don't just name them "State University" in both files; name them something like "State University A" and "State University B"). Also be careful that the same player (or team) is not given a different name in the two files (e.g., the program obviously can't determine if "Chris S." and "Chris Sewell" are actually the same person; it will assume they are different unless there is an exact character match). Finally, if you want separated standings for each file in the team standings reports, create a unique division in each file (check the "Use Divisions" checkbox under Settings->General, enter a division name on the Divisions Entry Form, press the Enter Button, and select the division in the Division Drop-Down Box for each team in the Roster Entry Form; see "Entering Rosters Manually" section in Help). Note that if one file use divisions and the other does not, any teams that are in the file without divisions but not in the file with divisions will not appear in the team standings report unless you create a division in the first file, or add these teams to an existing division after merging (by selecting a division in the Divisions Drop-Down Boxes in the Roster Entry Form).
Forms
After
beginning or opening a tournament, there will always be exactly one copy of
the Roster Entry Form, one copy of the Games Entry Form, and (if applicable)
one copy of the Division Entry Form open. Thus, the close box for these
forms actually minimizes rather than closes the windows, so that you don't
needlessly close and recreate these forms while the program is open.
This prevents accidental data loss.
The only way to actually close them is to choose Close All from the
File menu. Then you must re-open
a saved version of the tournament to continue working with it.
You may Tile, Cascade, or Arrange the forms using the Windows Menu.
Help
The
contents of this documentation is available in a full-featured Windows-style
help system, accessed by selecting Contents from the Help Menu or clicking the
Help Speed Button.
Contact
Contact Christopher Sewell at chrissewell@hotmail.com anytime for additional technical support, corrections, or suggestions.